Although I use Claude Code almost every day, one of the areas I have barely explored is connection via MCP with other services.
Today we will see how Claude Code behaves as an MCP client (although I already wrote the MCP setup guide for Claude Code), connecting with two of the most used services in the tech world to create a small automated code/UI review system.
What is MCP and why is it vital for Claude Code?
MCP is a protocol (created by Anthropic itself) that allows connecting Claude with thousands of external tools and services. Unlike a traditional API, which may have its own surface and structure, MCP normalizes access through a common interface. This way you can use the same protocol with services as different as Docker, GitHub, or Notion.
MCP is important because it allows you to extend your workflow with AI and incorporate real tools in real time, without leaving the conversational environment. It is not just another API: it is a direct integration layer with your stack.
The power of connecting tools (Silo Breaking)
Because Claude, on its own, knows how to do nothing. What it has is context and criteria.
But it has no access to your database, your errors in Sentry, your local files, your deployments, nor your designs in Figma. MCP gives it arms.
Using Claude Code without MCP is like having a project manager locked in a room without doors or windows. MCP breaks that isolation and turns Claude into a true orchestrator.
Additionally:
- It is more secure than allowing direct access: you define the servers and their scope.
- It is reproducible: you can version your
.mcp.jsonby project. - It is delegable: you can encapsulate commands as prompts and slash commands.
- It is extensible: if the server doesn't exist, you can create it yourself with the SDK.
If subagents change "how Claude thinks", MCP changes "what it can work with".
Types of MCP servers: Local vs Remote
The first thing is to take a look at its documentation, where they explain it wonderfully. In essence, there are two ways to "install" MCP servers so Claude can use them.
Although there are thousands of MCP servers available, they all group into at least these two categories.
Local servers (Ex: Playwright, PostgreSQL)
These are the ones that need access to your local files and processes, so they will run as such on your development machine. Speaking of e2e, both Puppeteer and Playwright need access to your processes to use a browser and to your files to, for example, save a screenshot.
Remote servers (Ex: Notion, GitHub)
Remote servers host all their infrastructure elsewhere and offer an interface so your MCP client (in this case Claude Code) can interact with them. Here enter most tools and services that every developer knows: Linear, JIRA, GitHub, Notion, etc.
Tutorial: Installing MCP servers in Claude Code
For this demo we will use two types of MCP servers:
- One remote, like Notion's, which connects via HTTP and requires authentication.
- One local, like Playwright's, which runs on your machine as a stdio process and needs browser access.
1. Connect Claude Code with Playwright (Local)
Microsoft Playwright requires the server to run on your machine because it needs browser access to execute E2E tests, take screenshots, etc.
I recommend you take a look at the documentation of its MCP server.
The command looks like this:
claude mcp add playwright -- npx @playwright/mcp@latest
And you will receive a confirmation similar to this:
# Added stdio MCP server playwright with command: npx @playwright/mcp@latest to local config
# File modified: **/Users/juan.nunez/.claude.json** [project: /Users/juan.nunez/Desktop/vue-project]
This is vital because, if you notice, it indicates where it has saved the installed MPC server information: .claude.json of my user directory, that is, user scope. This way I will be able to use Playwright in any project.
Of course you can modify the scope of MCP connections with Claude Code using the --scope user or --scope project flag when performing the installation.
2. Connect Notion with Claude Code (Remote)
In the case of Notion, the solution is not so simple. After testing what the official Claude Code documentation suggests, I ended up with a dead connection that was unable to authenticate with my Notion account.
The Notion documentation on MCP itself doesn't help either, as it doesn't include Claude Code as an MCP client.
If you act smart (like me) and think, “well, I can use Claude desktop and then export the data” you are going to get another surprise: It does NOT work since Notion MCP leaves no traces in claude_desktop_config.json:
{
  "mcpServers": {}
}
What to do then? Investigating I found this article 🙏 which suggests a different direction. This one did work.
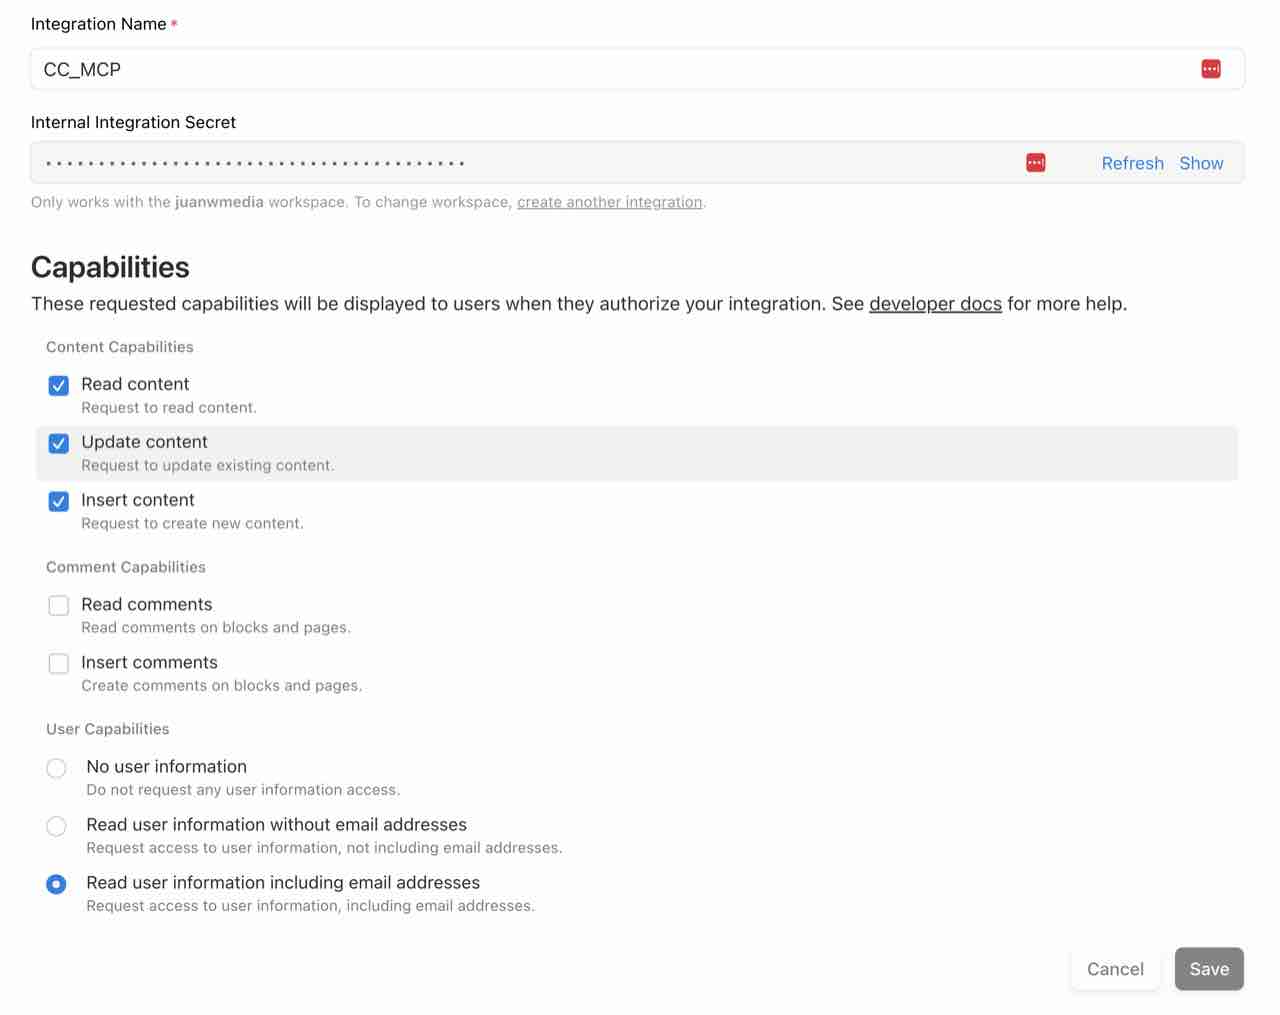
- Go to the integrations page of your Notion account.
- Create a new Internal integration.
- In Configuration assign the capabilities you need.
- Important: do not forget to go to Access and give access to your integration to, at least, one workspace page in Notion (or all).
With all this you will have a token/secret that you can use to authenticate all requests to the Notion MCP server. Copy it, you will need it to build the command:
claude mcp add notion \
  --env 'OPENAPI_MCP_HEADERS={"Authorization":"Bearer ntn_xxx","Notion-Version":"2022-06-28"}' \
  -- npx -y @notionhq/notion-mcp-server
Of course, change ntx_xxx for your token, and hit Enter. Now you should have both servers connected. Claude Code can:
- Take screenshots using the browser with Playwright.
- Write and save reports in a live database in Notion.
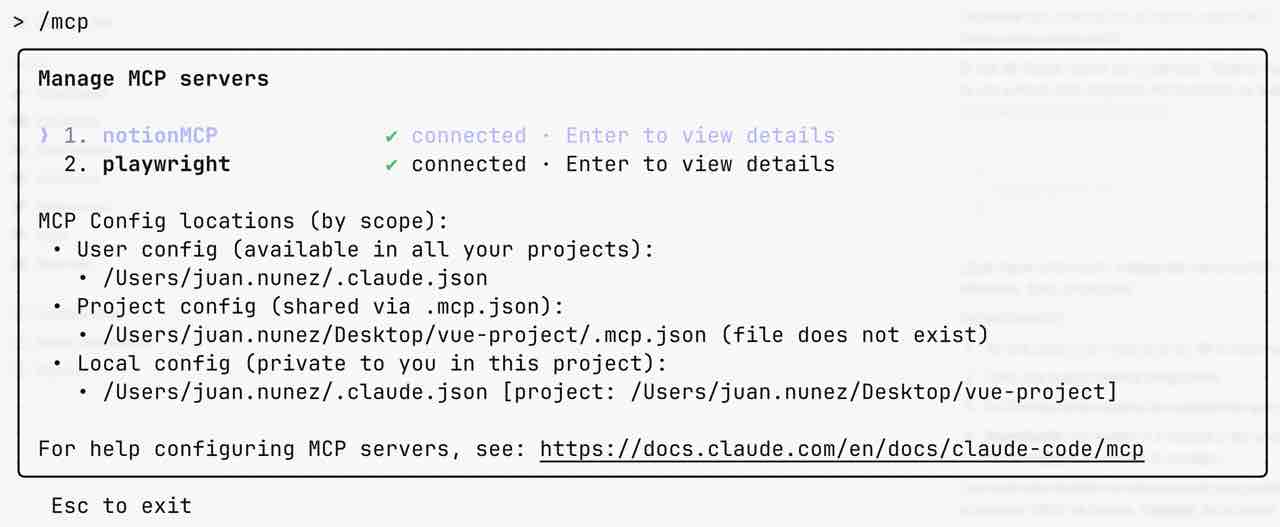
To clear up doubts access Claude Code and use the /mcp command, your output should be similar or include this:
Demo: Automated UI Review System
This is what we are going to use to play with MCP and Claude Code.
graph LR
  User --> A[Claude Code Command]--> B[Review Process]
  B <--> |Screenshot| C[Playwright MPC]
  B --> |Report| D[Notion MPC]
- We will create a —very basic— automated UX/code review system.
- Through a custom command we will give instructions to Claude.
- Claude will then use Playwright to take a capture of our work (for example, a view/component).
- Claude will compare it with the control image.
- Continuing, Claude will analyze similarities/differences at UI level, as well as internal structure and logic.
- To finish, Claude will generate a report that it will save in the page of your Notion workspace you prefer.
Creating a custom command (review-component)
This is one of my favorite features of Claude Code (again, I have already talked about custom commands and Claude Code) and I use it extensively.
In essence, it is about grouping instructions in a file (Markdown, ./claude/commands/review-component.md) to be able to send them repeatedly to the model through a command (/review-component).
It accepts arguments through $ARGUMENTS and you can even use Bash-style placeholders with $1, $2, $N. The documentation is quite good.
This is the command (review-component.md):
I want you to review my component from a markup, logic and UI level.
The component is located here: $1
You can see it live if you use the Playwright MCP server to open: $2
And you can compare with the desired result using this reference image: $3

Do the following:
1. Use Playwright to take a screenshot of the live component.
2. Compare it to the reference image and assess visual accuracy.
3. Analyze the source component for:
   - HTML structure and semantic correctness.
   - JavaScript / TypeScript logic quality.
   - UI/UX quality and adherence to modern Tailwind CSS conventions.
4. Write a succinct but professional analysis covering markup, logic and visual output.
5. Save the report as a new entry in the ScratchPad page in Notion via the Notion MCP server.

Use expert-level vocabulary. Avoid generic feedback. Output must be directly actionable.
Executing the Review
Once you save the Markdown file the command will be ready to use with Claude Code. Now you just have to provide the arguments.
In this example I ran it on a small Vue.js project.
/review-component @src/components/ProfileCard.vue http://localhost/5114 [Image]
Where:
/review-componentis the invocation to the custom command we have created ($1).@src/components/ProfileCard.vueis the path to the artifact (component, view, etc) we want to validate ($2).[Image]is the control image against which we want to compare our artifact ($3).
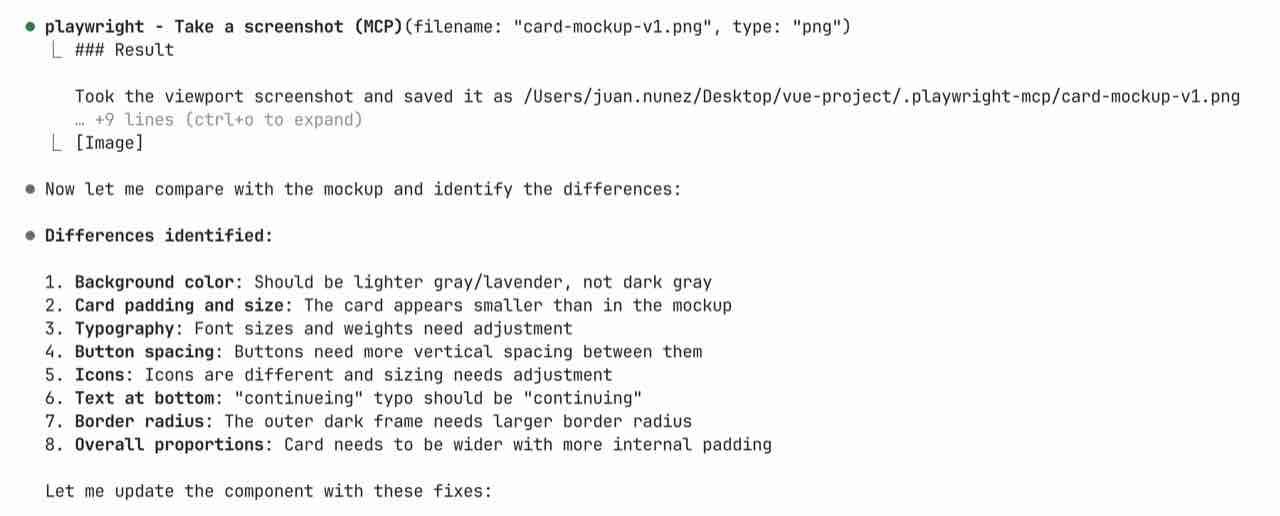
Final Result
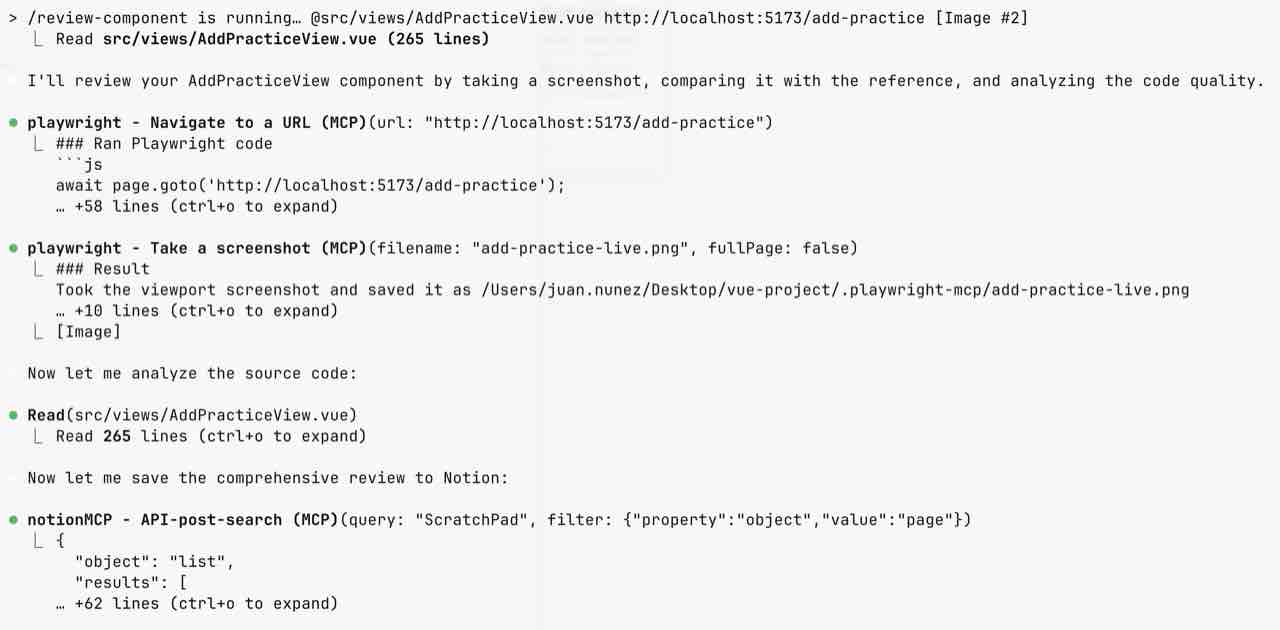
When executing the command you will see how Claude starts processing information and performing its analysis. It is likely that it asks for authorization in each different interaction with MCP servers, but you already know how to modify permissions when working with Claude Code (link to my Claude Code guide).
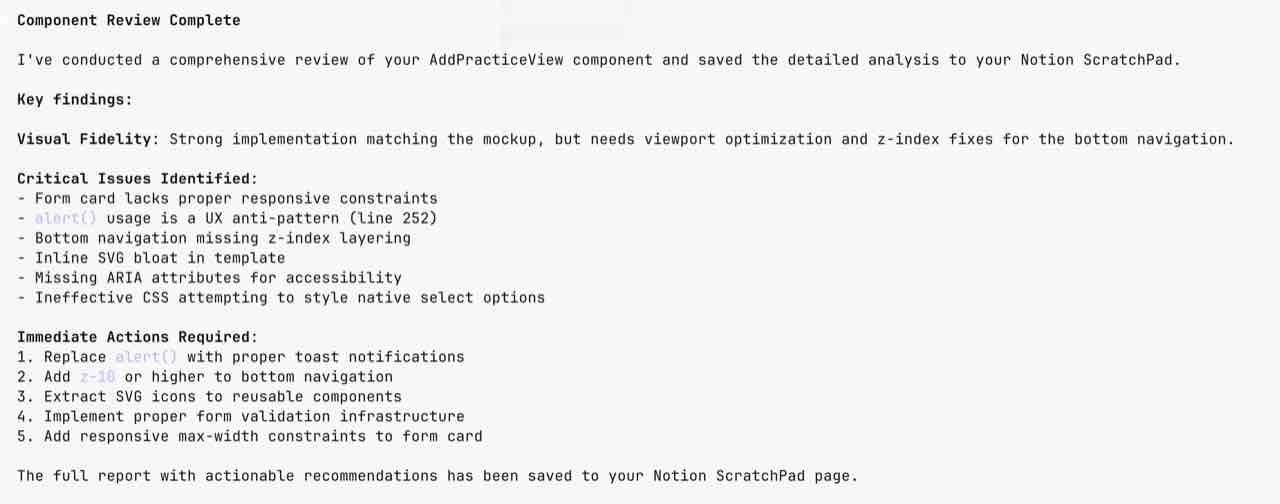
Upon completion you will have a report on the page of your Notion workspace you have chosen. Something similar to this.

How to scale this system
As you have been able to verify, this example is just the tip of the iceberg. In other words: much —much more— can be done with the tools offered by Claude Code.
It all depends on your situation, circumstances, goal, and workflow, but here are some ideas.
- Detail the prompt much more (here is a small guide on AI prompting to receive feedback on specific areas, or using a key technology, etc
- Ask Claude to rate the artifact from 0 to 10 and attach a comparison image between the result and the control image.
- If you want to take this a little further, you can modify the entire process and make it more or less mandatory every time there is a change incorporation in your codebase (pre-commit hook). Check the Claude Code hooks practical guide for ready-to-use examples.
- You can even give Claude the option to "correct" the artifact to look like the model. It is an iteration between capturing image → correcting. I have tried it myself and it is a quite interesting workflow.
Conclusion
The MCP protocol is not just another integration: it is a way to unlock real execution from the conversational environment. Claude stops being an observer and becomes an active part of your tools.
This, combined with the modularity of subagents and the power of custom commands, creates a new paradigm: composing intelligent automation from your prompt.
If you want to know more about how to structure these complex interactions, I recommend reading about Subagents in Claude Code.